CASE the Catalog - Wildflower Birthday Suite Collection

CASE The Catalog!
This week on my delightful Marvelous Monday Facebook Live, I had the wonderful opportunity to CASE (Copy And Selectively Edit) directly from the catalog! I truly enjoyed every moment of recreating these stunning handmade cards using the beautiful Wildflower Birthday Suite Collection from Stampin’ Up!’s Jan-Apr 2025 Mini Catalog. These charming cards are not only simple to make but also perfect for adding that special, personalized touch to any birthday celebration, making each festive occasion even more memorable and heartfelt.
Let’s dive into how you can recreate these cheerful designs!
The Supplies you will need is: Wildflower Birthday Suite Collection; coordinating cardstock: Petal Pink, Soft Sea Foam, Blueberry Bushel and Basic White; adhesive; cutting implements; Stampin’ Cut & Die Machine!


HAPPY DAY
I love it when a suite comes with such easy components that even beginner stampers can create exquisite cards! This CASE’d card from page 42 of the Jan-Apr 2025 Mini Catalog, using the Note Cards and Envelopes. This suite’s lovely cut-out page pieces fit perfectly on the 3-1/2”x5” note card, so all you need to do is add a focal point and sentiment! After cutting out the piece and gluing to the Note Card, I die cut the flags from the Birthday Celebration dies in Basic White cardstock and glued them to the front, then popped up a 2-1/2”x7/8” piece of cardstock with the combined sentiments “Happy Day” stamped in Pretty In Pink ink. I popped up the cake from the pre-printed gold foiled die-cut page and added the adorable Party Dots as a final touch! Don’t forget to add Wildflower Birthday DSP to your envelope flap.
PS. I did miss the Gold 1-1/2” Open Weave Trim behind the cake… twice… oops.

Hooray…
While this card is not cased, it was another easy peasy card! I used an A2 card base in Blueberry Bushel cardstock, then glued one of the cut-out pieces from the Wildflower Birthday DSP, 3-1/2x5 in size, to the front. I then stamped in Blueberry Bushel ink the combined sentiments on one of the tags from the cut-out page (the inside says “11th birthday”), and layered it with another piece of cardstock from that page and popped them up in the bottom right corner. I then popped up the gold foiled banner from the pre-printed gold foiled die-cut page, along the 3 cute cupcakes. I then added the Party Dots and the Wildflower Birthday DSP to the envelope flap.

Hooray, cake…
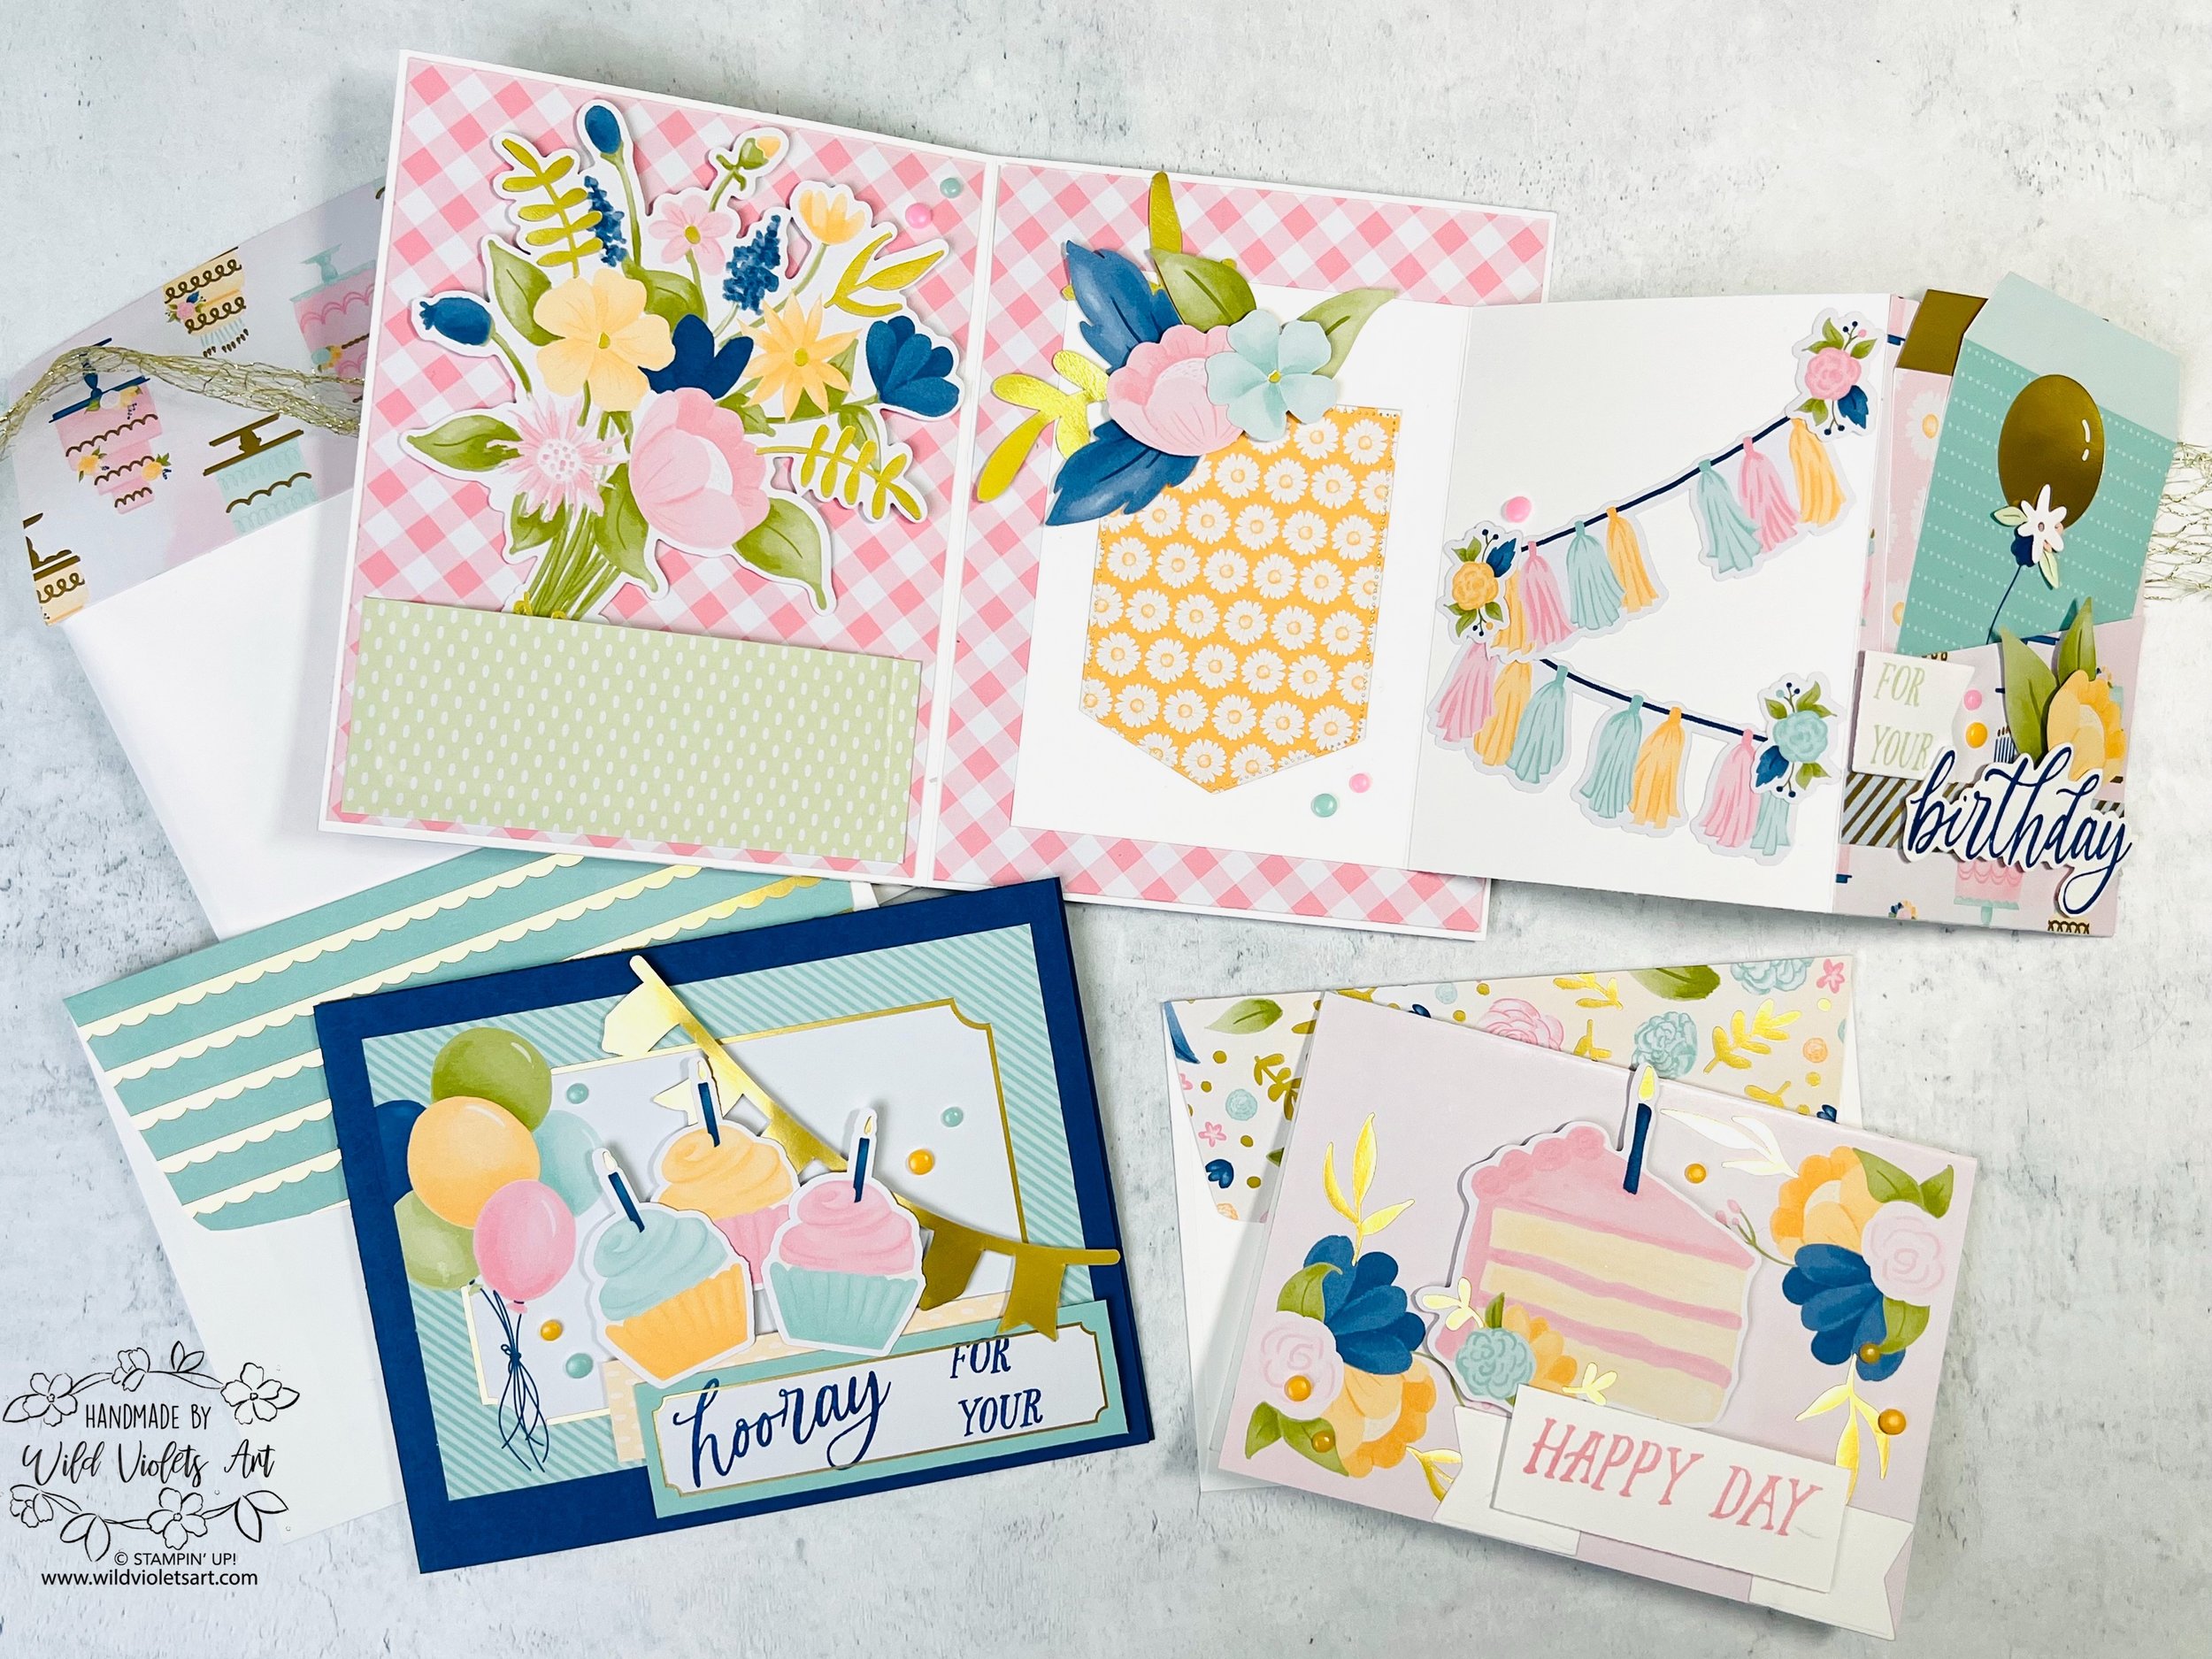
For this lovely and delightful fun-fold card, I CASE’d it from page 44 of the Jan-Apr 2025 Mini Catalog, which features an array of inspiring designs. If you take a moment to review the photo from the catalog, you will see that it is very close to the original but with just a few minor edits that add a personal touch. It is truly such a lovely card, and I absolutely adore the use of the pre-printed gold foiled die-cuts, which really elevate the overall design. Be sure to watch my video for my step-by-step details that will guide you through creating your own version!
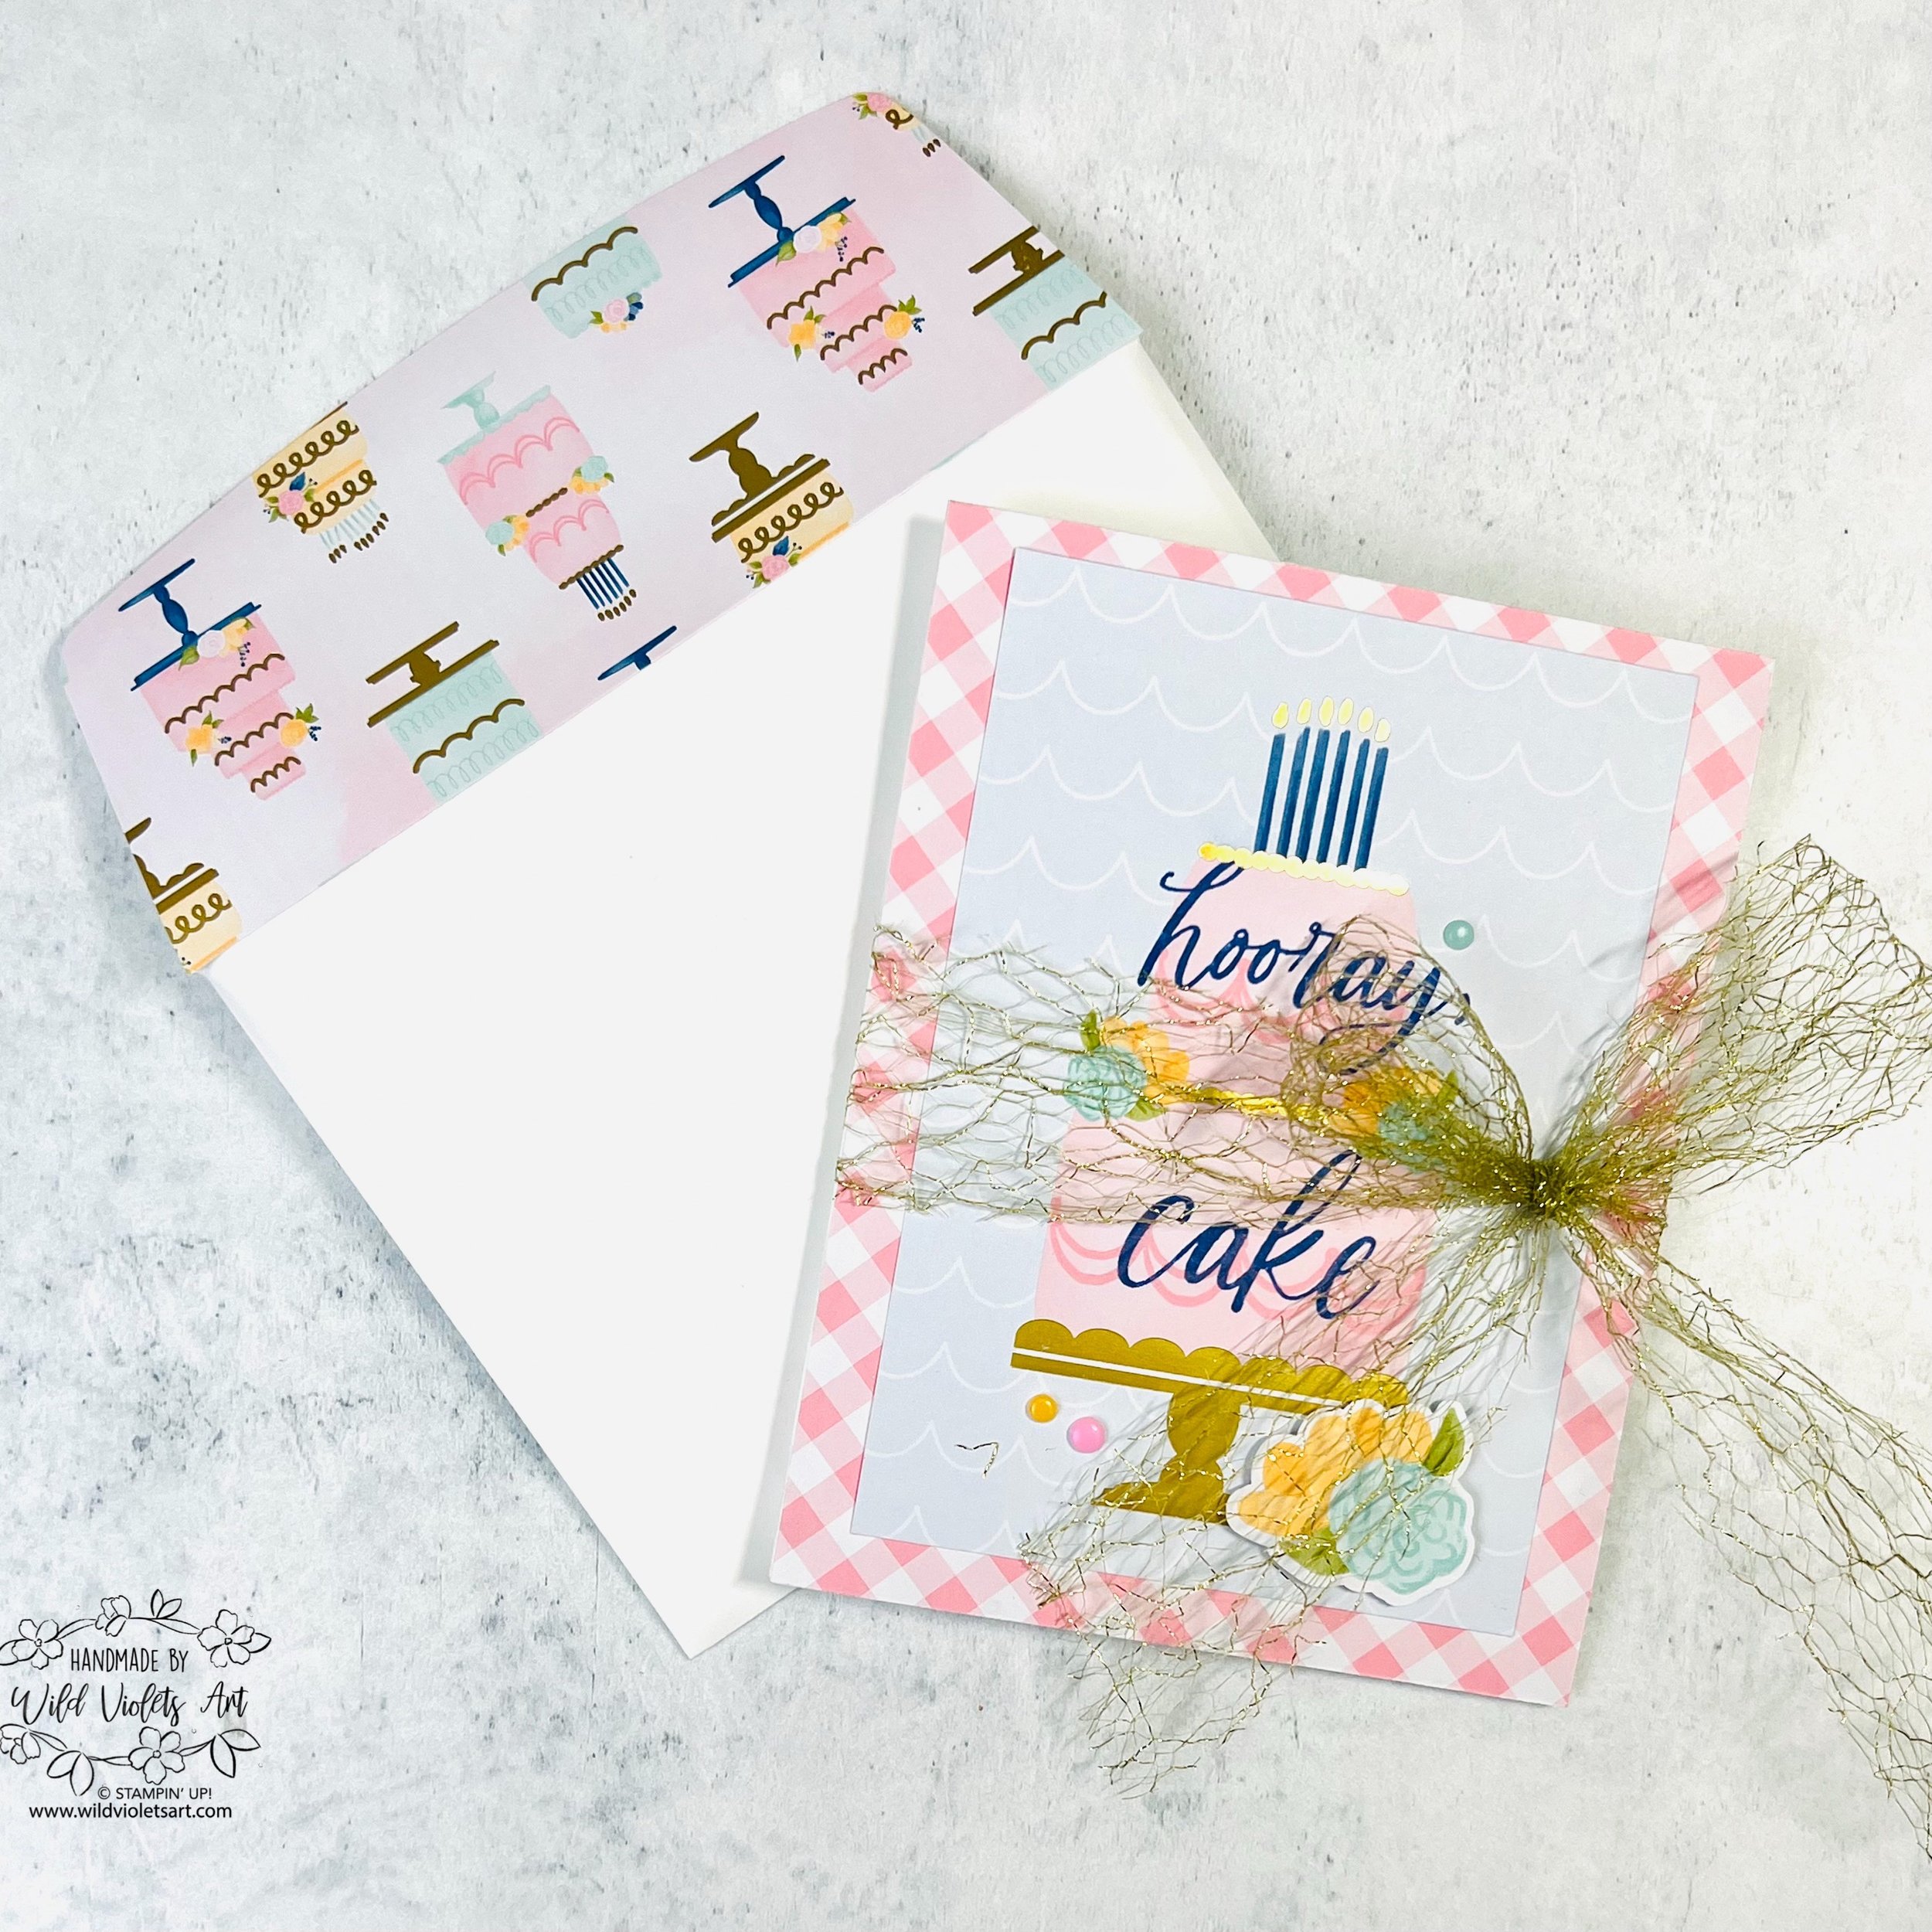
One thing the catalog does not do, is show what the front of the card looks like. I used a 4-1/4”x5-1/2” piece of the pink check Wildflower Birthday DSP to cover an A2 card front. I then added the adorable tiered cake piece from the DSP and added it and one of the pre-printed gold foiled die-cuts.
For the outside, I stamped “hooray, cake” to match the inside saying “for your birthday”. I used Blueberry Bushell ink for the sentiment, then added Party Dots. To keep to the cake theme and match the Wildflower Birthday DSP on the inside fold-out, I added the matching DSP to the envelope flap.

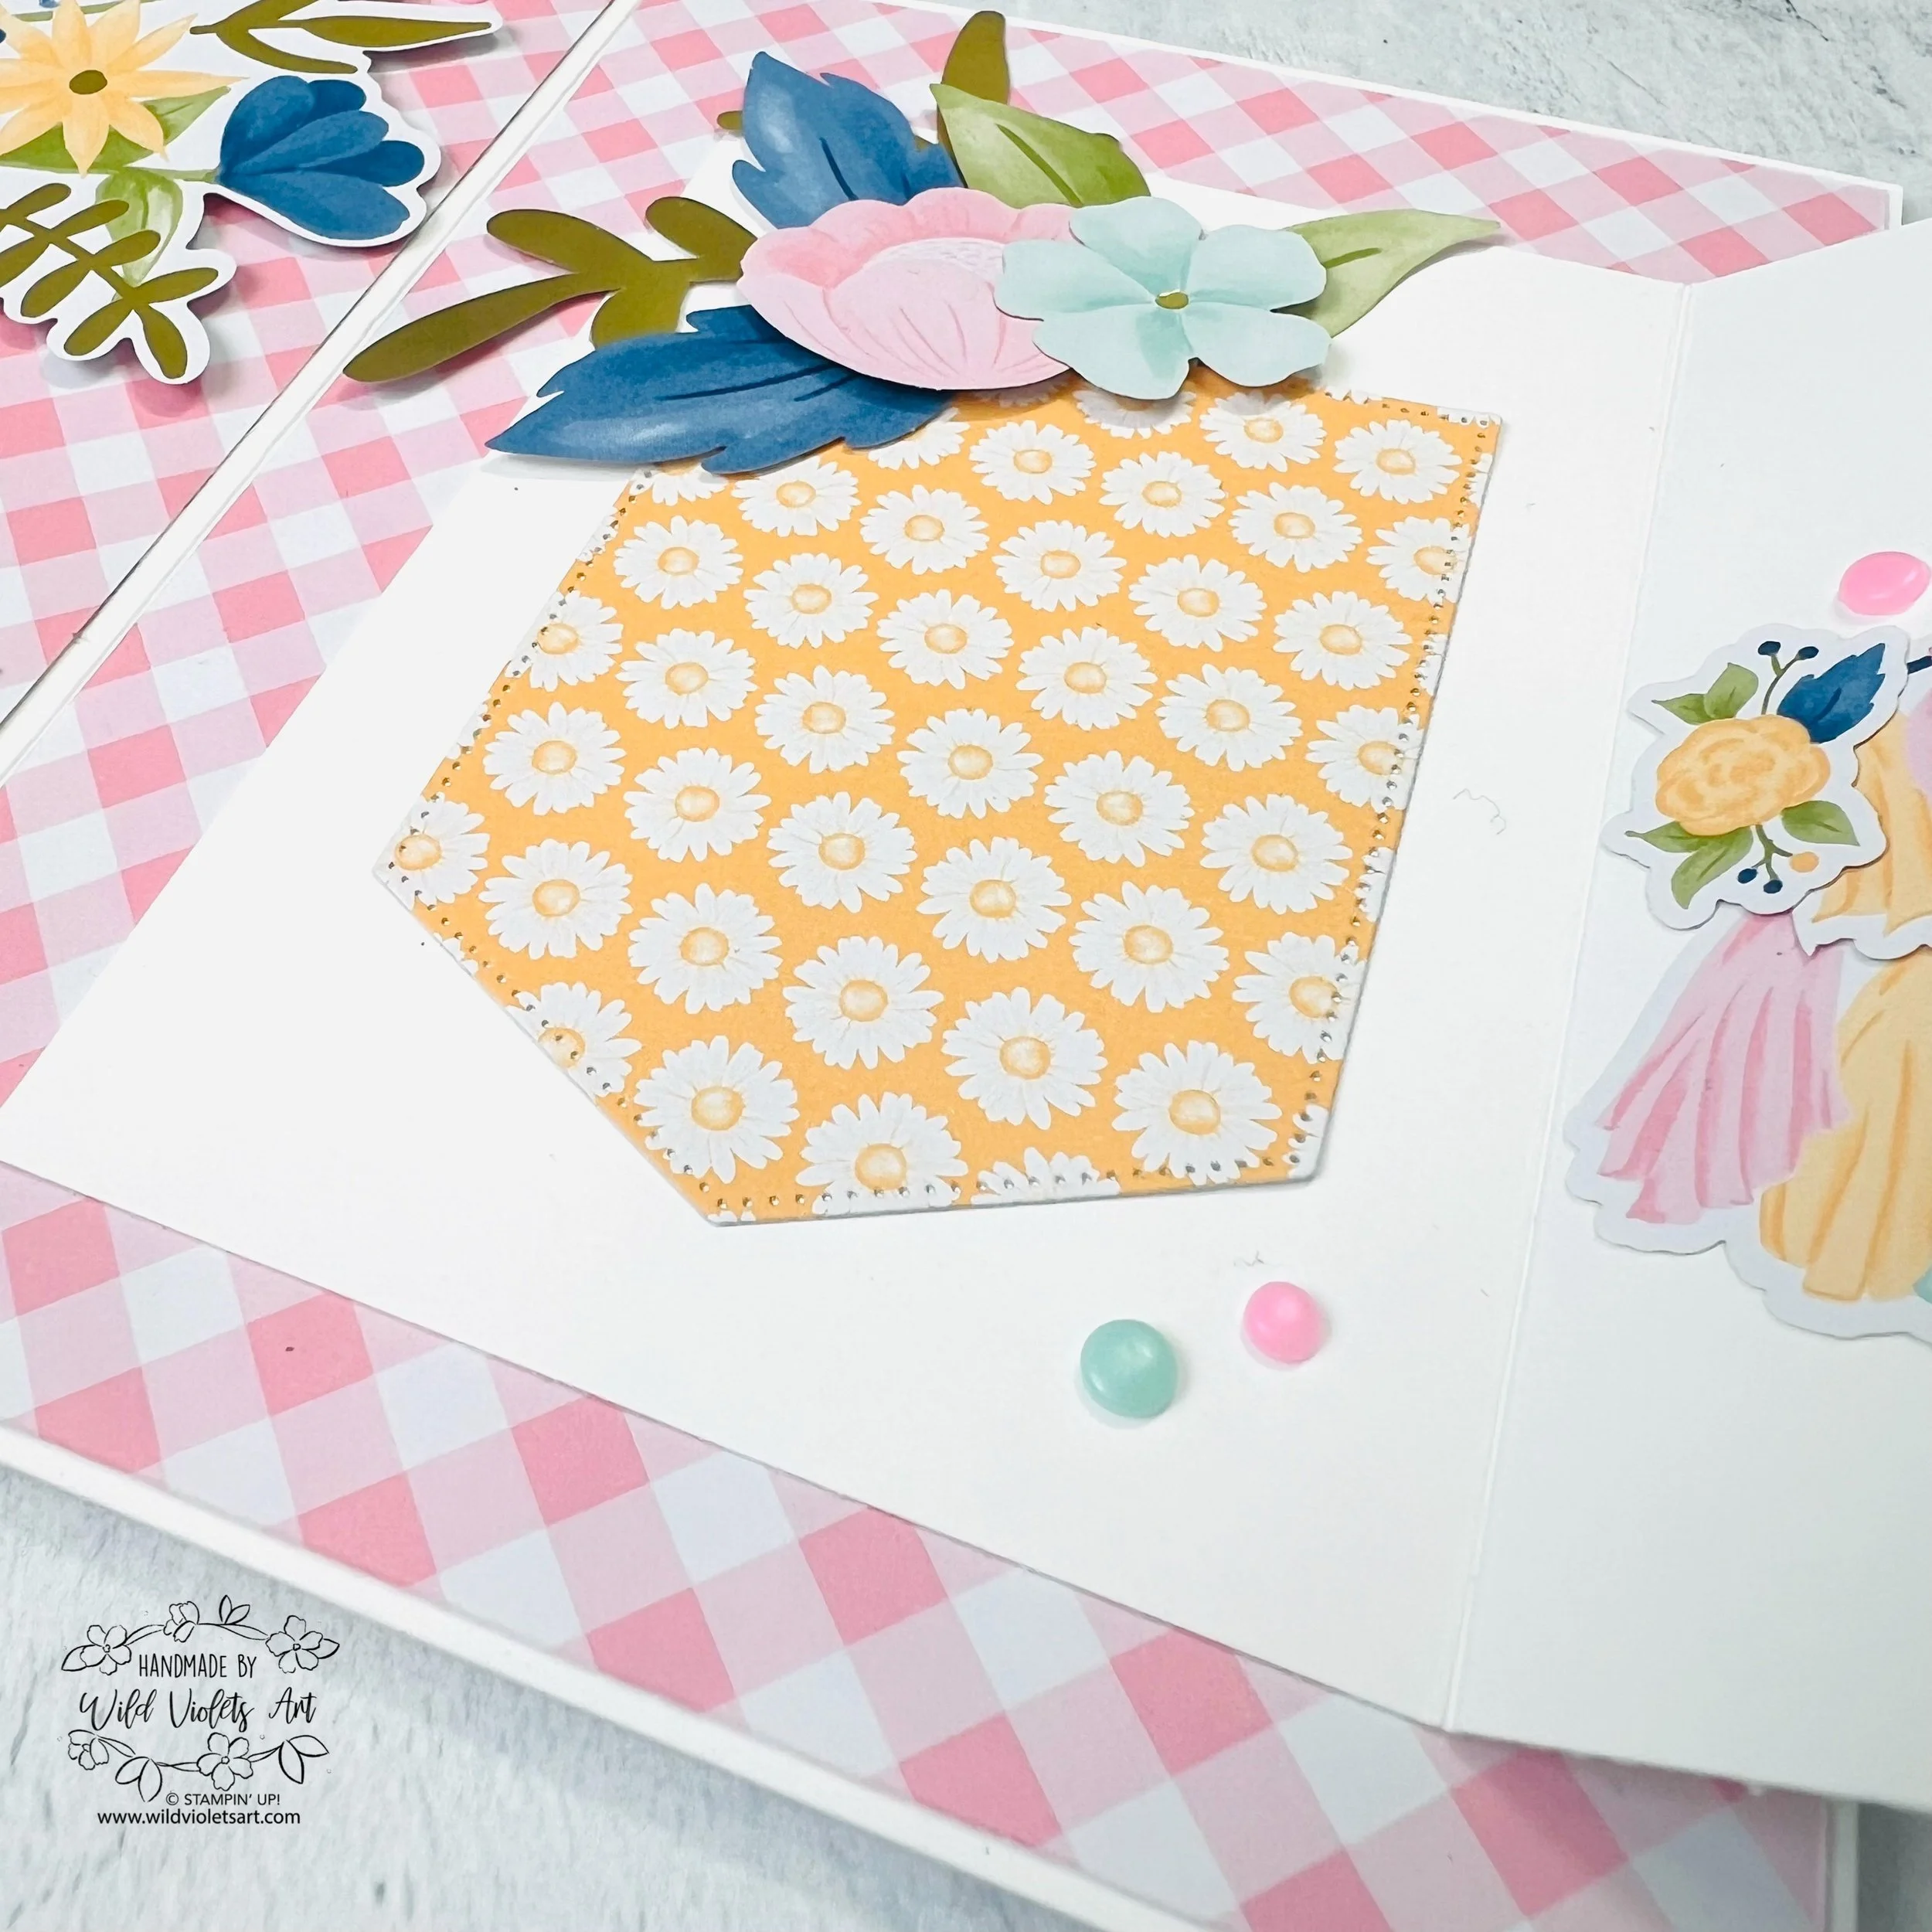
For the inside of this adorable fun-fold card, you will need the following: two more 4-1/8”x5-3/8” pieces of the pink check DSP. Basic White CS 9”x4-1/4”, scored at 3” & 6” and folded into an accordion. Soft Sea Foam DSP for gift card, 4"x1-1/2” DSP for the pocket die, two tags from the cut-out page, a 3”x4-1/4” of birthday cake DSP, and a 2”x4” piece of DSP for the two sentiments “for your” and “birthday” and the flower on the balloon. A scrap of Soft Sea Foam, Blueberry Bushell and Petal Pink cardstock for the flowers on the balloon. You will also need the shown pre-printed gold foiled die-cuts.
On the inside left, glue down the pink check DSP to the inside of the card. Take the Soft Sea Foam DSP and carefully add Tear & Tape around the two sides and bottom, so a gift card will fit in a pocket. Watch my video for tips on how to add this and allow the gift card to easily slide in & out. Then tuck the wildflower bunch into the pocket, popping up the blooms with Stampin’ Dimensionals.

On the inside right, glue down the pink check DSP to the inside of the card, then adhere the folded 9”x4-1/4 Basic White cardstock to the center of the area, making sure it will open out to the right of card.
For the first panel, die cut your pocket/banner in the DSP or cardstock of your choice, glue down and decorate with the pre-printed gold foiled die-cuts. I did not add a year in the die cut numbers shown in the catalog, as I did not have an age for the friend I was making this for. Add the Party Dots as shown.

For the second panel, the catalog shows 3 swags from the tassel banner, but that uses 1 and a half of the tassel banners from the pre-printed gold foiled die-cuts.
I used one and cut it in half, carefully trimming where I cut them in half. I then glued them down and added the florals at each of the 3 ends. Add the Party Dots as shown.

For the last panel, I used a 3”x4-1/4” piece of the birthday cake DSP, then cut it at a slight diagonal. The top portion, I glued it to the panel. For the bottom portion, I used Tear & Tape to adhere and make it into a pocket so the two tags from the cut-out page can be used for extra sentiments or just for fun. Watch my video for step-by-step instructions.
Stamp the “birthday” sentiment in Blueberry Bushel ink on the Basic White cardstock and fussy-cut. Stamp the “For Your” sentiment in Soft Sea Foam ink and die-cut it out with the largest of the two banners from the Birthday Celebration dies. At the same time, you can die cut out the mini flowers and leaves in the cardstock. Add the two sentiments by popping them up on your panel. Add the pre-printed die-cuts as shown then add the die cut mini flowers as shown.
For the final items on the fun fold card, add 26’ of the Gold Open Weave Trim to keep the fun fold card closed with a pretty bow. You do not need to, but I added a scrap 2-1/2” square to keep the trim in place when the card is opened. I then added the party dots to each panel here and there. Amazingly, the lovely card fits in the envelope, so be sure to add DSP to the flap.
Tips for Success:
• Layering is key: The Wildflower Birthday Suite DSP is designed to layer seamlessly. Mix patterns and solids for a professional look.
• Use Stampin’ Dimensionals: Adding depth to your die cuts and embellishments brings your cards to life.
• Personalize the sentiments: Adjust the greetings to suit the recipient or occasion.
Catch the Replay! If you missed the live, you can catch the replay on my Facebook page or YouTube channel! I walk you through each step in detail and share some helpful tips and tricks.
Let me know which card is your favorite, and don’t forget to tag me in your creations—I’d love to see what you make!